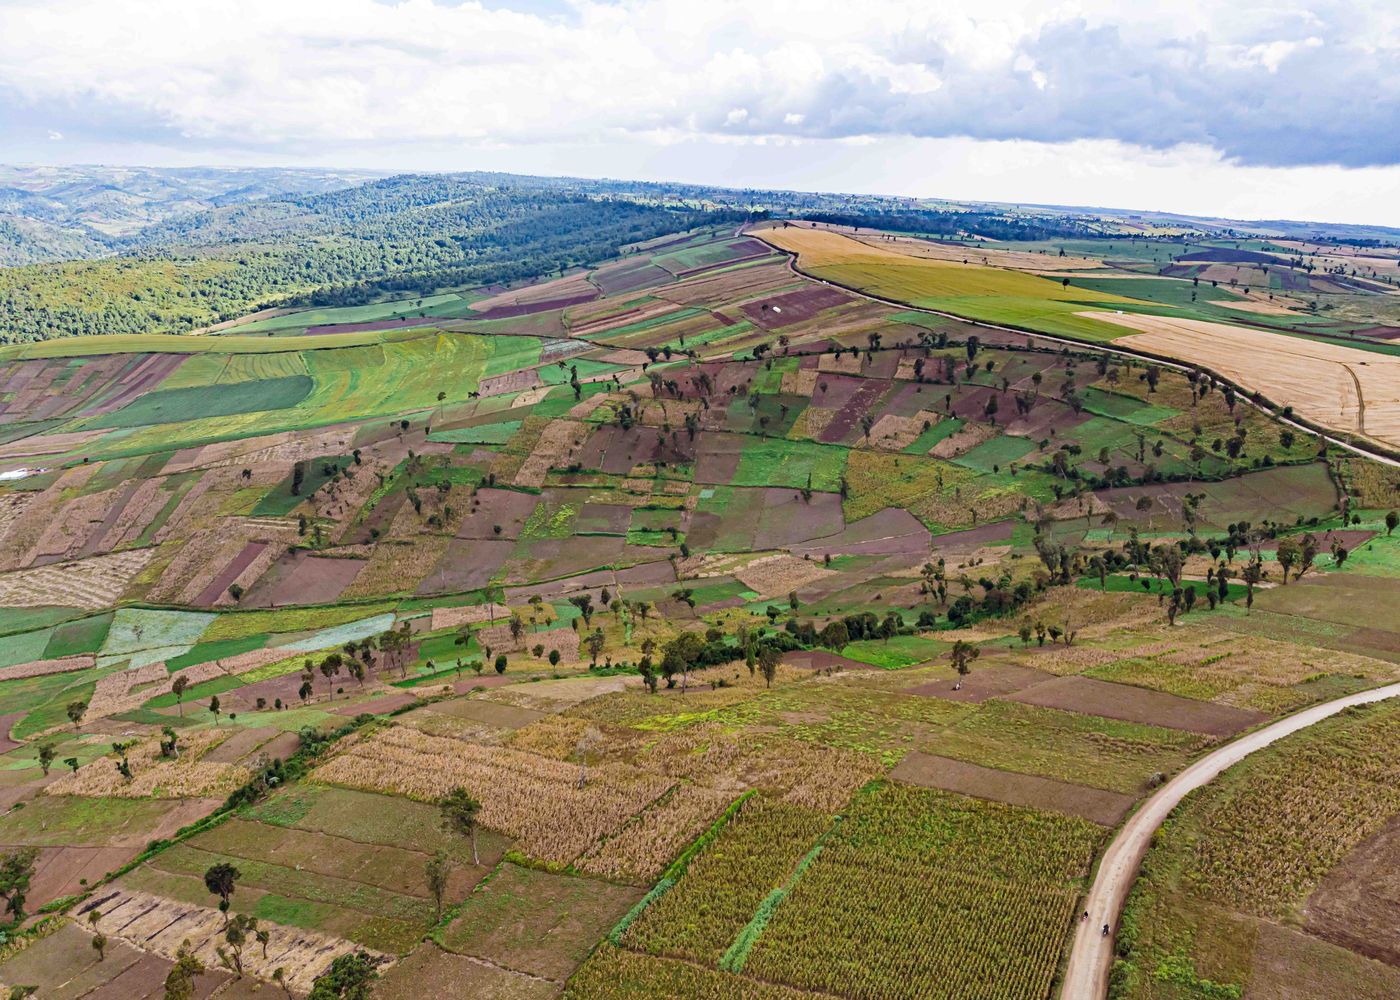
Look at the hillside farms in the photograph above, taken over Mau Narok, and you can read the rain on them. On a sloping field, every heavy storm sends water running downhill, and where it runs it carries topsoil, seed and fertiliser with it. Where it is slowed, held and spread along the slope, it soaks in and stays for the crop. The difference between the two is almost always a line drawn across the slope at exactly the same height: a contour.
Kenyan farmers have built soil and water conservation along contours for generations, from fanya juu terraces to cut-off drains and furrows. All of it depends on one skill that is surprisingly hard to do by eye: finding points on uneven ground that are truly at the same level, or that fall by a small, controlled amount. The eye is fooled by the shape of the land, and a trench that looks level can be 20 centimetres out across a field. Water finds that error at once.
The cheapest accurate tool for the job is a length of clear level pipe filled with water. This guide explains why it works, how to make and check one, how to peg a contour line across a slope, how to set a gentle fall for a drain or a furrow, how to measure the height of a tank above a field, and the mistakes that throw the reading off. For using a line level, an A-frame and other layout tools, see our guide to measuring and layout tools.
Why a Water Level Never Lies
Fill a flexible tube with water and lift both ends. However the tube runs between them, over a ridge, through a dip or around a tree, the water surface at each end settles at the same height. This is the principle of connected vessels: water at rest in a continuous body has a level surface, because any difference in height would mean a difference in pressure that pushes water until it evens out. Builders have used it for centuries to level foundations, and it works just as well across a field.
The tube only shows where level is; you read the ground against it using two poles. Tie each end of the tube to a straight pole marked in centimetres from the bottom, the same on both. Stand one pole at point A and the other at point B. The water surface is at one height, so if the ground at B is lower, the water will read higher up the B pole. The difference between the two readings is the difference in ground height between A and B.
Making and Checking Your Level
You need a length of clear level pipe, two straight poles of the same length, a tape measure and some string or tape to fix the tube. A pole of about one and a half metres is easy to carry and tall enough for most slopes. Mark both poles in centimetres from the bottom, starting at exactly the same point, or fix a measuring tape to each. A 50 metre pipe is longer than you need for each step, but the spare length lets you work around obstacles and can simply be coiled.
Fill the tube carefully, because air bubbles are the main source of error. The easiest way is to lay the tube out downhill from a bucket raised on a stand and let water siphon through it slowly until it flows out clear and without bubbles. A little tea or food colouring in the water makes the level easier to see in bright sun. Tie the ends to the poles so the water sits around the middle of each when both poles stand on level ground.
Then check it. Stand both poles side by side on the same spot, or on a flat concrete floor, and wait for the water to stop moving. Both readings must be the same. If they differ, there is a bubble or a kink trapping water somewhere; lift and run the tube until the bubble moves out, and check again. Do this check at the start of every session. It takes a minute and it is the only proof that your level is telling the truth.
Measuring How Steep Your Field Is
Before pegging anything, measure the slope, because it decides what kind of conservation work makes sense and how closely the lines must be spaced. Stand pole A near the top of the field and pole B exactly 10 metres straight downhill, measured with the tape along the ground. Read both poles. The difference in centimetres, divided by the 1,000 centimetres between the poles and multiplied by 100, is the slope in percent. A difference of 80 centimetres over 10 metres is an 8 percent slope.
Take readings in three or four places, because fields are rarely one even slope. A field that is gentle at the top and steep near the bottom needs lines closer together on the steep part. Write the figures down with a rough sketch of the field; they are exactly what an extension officer will ask for when you seek advice on line spacing.
Pegging a Contour Line Across a Slope
A contour is a line joining points of equal height. To peg one, decide where the line should start, often at the edge of the field or at a point a set distance below a ridge. Stand pole A on that starting peg. Your helper carries pole B across the slope, roughly along where the line should run, five to ten metres away. The helper moves pole B up or down the slope until its reading equals pole A's reading. That point is at the same height as the start. Drive a peg there.
Now leapfrog. Pole A moves to the new peg, pole B moves on another five to ten metres, and you repeat. Short steps follow the shape of the land more closely, and a contour on real ground is never straight: it curves out round spurs and bends in at hollows. Do not straighten it. When the pegs are in, walk the line and smooth out any sharp zigzag between neighbouring pegs, but keep the overall curve, because the curve is the true level.
Once a line is pegged, it becomes the guide for the work. A fanya juu terrace is built by digging a trench along the contour and throwing the soil uphill to form a bank; over the seasons, soil washed down the slope collects behind the bank and the field gradually levels into a bench. Fanya chini throws the soil downhill instead. A planting line along the contour, with ridges or tied ridges across the slope, slows water between the conservation lines. How far apart to set the lines depends on the steepness, the soil and the rainfall, and your local agricultural extension officer can advise on the spacing used in your area.
Setting a Gentle Fall for Drains and Furrows
Not every line should be perfectly level. A cut-off drain above a field, a diversion channel to a water pan, or an irrigation furrow needs a small, controlled fall, so water moves along it slowly without standing and without scouring the channel. Our guide to farm drainage explains where cut-off drains go; the water level is how you set their fall.
Gradient is the drop divided by the distance. A fall of 0.5 percent means 0.5 centimetres of drop for every metre, or 5 centimetres over 10 metres. To peg it, set pole B the chosen distance from pole A along the line, and move it until it reads that much higher than A, because a higher reading means lower ground. For 0.5 percent over a 10 metre step, pole B should read 5 centimetres more than pole A. Peg, leapfrog and repeat to the outlet.
Which gradient to use depends on the soil and the job. For irrigation furrows, widely used guidance, including FAO's irrigation training material, puts suitable slopes roughly between 0.05 and 0.5 percent: steep enough for water to reach the end of the furrow, gentle enough not to wash the soil. Sandy and easily eroded soils sit at the gentle end. For drains and diversion channels, seek local advice, and always lead the outlet to a safe, grassed or stone-protected spot rather than onto a neighbour's land or a footpath.
Measuring Height for Gravity Water
The same tool answers a question every farm with a tank eventually asks: how much higher is the tank than the field? That height is the pressure available to a gravity-fed line, roughly one bar for every ten metres. Start with pole A at the base of the tank stand and pole B a step downhill, read the difference, then leapfrog downhill, adding up the differences until you reach the field. The total is the height difference between the two points.
Add the height of the tank stand and the water depth in the tank, and you have the head driving the water. Our guide to tank stands and gravity flow shows how to turn that height into an expected pressure, and the one on pipe sizing explains how much of it the pipe will use up on the way. For catching the water in the first place, see our guide to rainwater harvesting.
Mistakes That Throw the Reading Off
Air bubbles. The commonest fault. A bubble in a dip or a hump of tube splits the water column and the two ends stop agreeing. Check the poles side by side regularly, and refill if a bubble will not move out.
Reading too soon. When a pole is moved, the water surges up and down for a while. Wait until both surfaces are still before reading, especially on long tubes.
Pinched or closed ends. Fingers or corks over the ends stop spills while you walk, but both ends must be open to the air when you read, or trapped air pressure shifts the levels. A kinked tube can also block the water from settling.
Poles not upright or not standing on the mark. A leaning pole reads high, and a pole set on a clod or in a hole reads the wrong ground. Stand each pole straight on firm ground right at the peg.
Reading the wrong way round. Remember that a higher reading means lower ground. Say it aloud the first few times, and write each pair of readings down in a notebook as you go.
| Item | Stock code | Price |
|---|---|---|
| LEVEL PIPE 6MM*50M | 6288 | KSh 800 |
| MEASURING TAPE 30M/100FT | 6627 | KSh 250 |
| MEASURING TAPE 5M/16FT | 6648 | KSh 88 |
| JEMBE 2.5 COCK BRAND | 6252 | KSh 370 |
| SHOVEL METAL HANDLE | 6621 | KSh 400 |
| PANGA STRAIGHT -LD FALCON | 6327 | KSh 200 |
Prices are from our current price list and can change, so confirm before you buy. The level pipe is the instrument; the tapes mark the poles and measure the steps, the panga cuts pegs and poles, and the jembe and shovel dig the line once it is pegged.
A Morning's Work, Start to Finish
Fill the pipe without bubbles, tie it to two marked poles and check that both read the same side by side. Walk the field to decide where the first line should start, and peg it. Leapfrog across the slope in short steps, setting each peg where the readings match for a level line, or where pole B reads higher by the planned drop for a graded one. Walk the finished line, smooth sharp kinks and mark a safe outlet.
Do this before the rains, when the ground is workable and there is time to dig. One 50 metre level pipe, two poles and a helper can peg several contour lines in a morning, and those lines decide where the next storm's water goes: into the soil of your field, or down the slope and away.
Key Takeaways
- A water-filled clear pipe shows the same level at both ends however it runs, so two marked poles read height differences accurately.
- A higher reading on a pole means lower ground; the difference between the two readings is the height difference.
- Check both poles side by side before every job; if they disagree, an air bubble is giving false readings.
- Peg contours by leapfrogging short steps across the slope, and keep the natural curve of the line.
- Gradient is drop over distance: 0.5 percent is 5 cm over 10 metres, set by making the downstream pole read that much higher.
- A level trench that is slightly out spills all its water at the low point, so peg carefully and give every line a safe outlet.
Frequently Asked Questions
How does a water level pipe work?
Water at rest in a continuous tube settles at the same height at both open ends, however the tube runs between them. Tie the ends to two poles marked in centimetres from the bottom and stand them on two points. The difference between the readings is the difference in ground height, with the higher reading on the lower ground.
How do I mark a contour line with a water level?
Stand one pole on a starting peg and move the second pole across the slope, five to ten metres away, until both read the same. Peg that point, move the first pole to it, and repeat. Keep the steps short so the line follows the land, and do not straighten its natural curves.
What gradient should a farm drain or furrow have?
It depends on soil and purpose. For irrigation furrows, widely used guidance including FAO's irrigation training material puts slopes roughly between 0.05 and 0.5 percent, gentler on sandy or easily eroded soil. For cut-off drains and diversion channels, ask your local agricultural extension officer, and always lead the outlet to a safe, protected spot.
Why do my water level readings keep changing?
The usual causes are an air bubble in the tube, reading before the water has settled, a closed or pinched end, or a pole that is leaning or standing on a clod. Stand both poles side by side to check they agree, move bubbles out by lifting the tube, wait for the water to stop moving, and keep both ends open when reading.
Can I use a level pipe to find how high my tank is above the field?
Yes. Start with one pole at the base of the tank stand and leapfrog downhill to the field, adding up the differences in readings at each step. Add the stand height and the water depth in the tank to get the head driving the water, which gives roughly one bar for every ten metres.